If you’re searching for a stunning yet beginner-friendly balloon garland project, this DIY tutorial is for you. Learn how to create a lilac-toned balloon arch with butterflies and built-in lighting that will transform any space into a magical setting. Whether you’re preparing for a birthday, baby shower, or any celebration, this guide will walk you through each step in detail, ensuring your decor looks professionally made.
What Makes This Balloon Arch Unique?
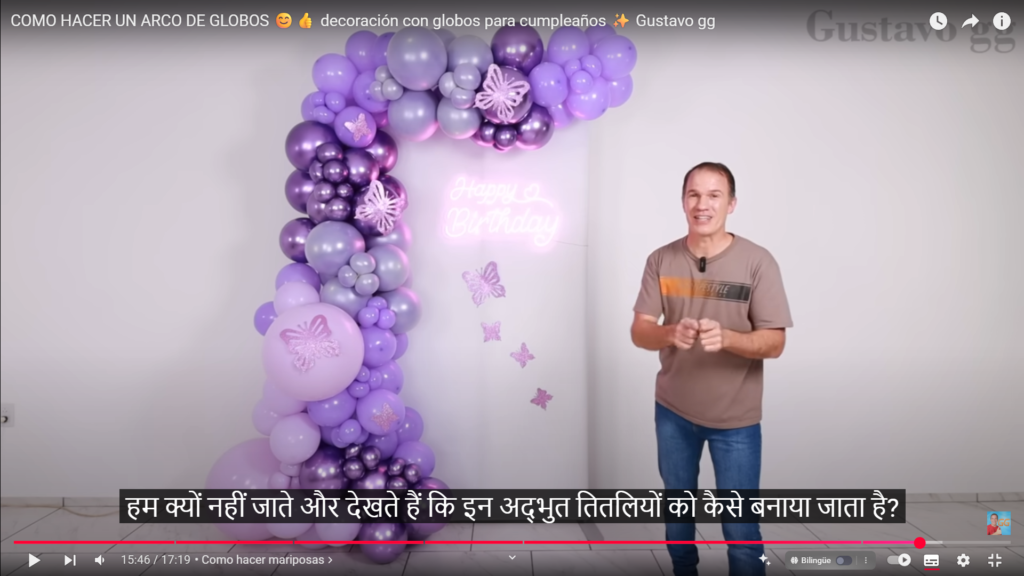
This balloon garland stands out due to its combination of soft lilac tones, butterfly accents, and a glowing light-up sign. It mixes basic balloon techniques with creative layering and visual balance to deliver a high-impact look. The tutorial is designed for beginners, making it accessible without sacrificing aesthetics.
Why Choose a Balloon Garland for Your Decor?
Balloon arches have become a staple in event decoration due to their versatility and visual appeal. Here are some reasons to consider them:
- Budget-friendly Elegance: Balloon garlands give you a luxurious look without breaking the bank.
- Customizable Designs: You can easily adapt colors, sizes, and accessories to match any theme.
- Great Photo Backdrops: They provide a perfect background for photos, adding vibrance and charm to memories.
- Lightweight and Portable: Using lightweight structures and aluminum frames makes transportation and assembly easier.
What You’ll Need
- Balloons in lilac, violet, and white
- Nylon string (0.40 thickness)
- Balloon pump or inflator
- Measuring stick or caliper
- 260 balloons (for tying)
- Clips and clamps
- Glitter foam paper
- LED neon sign (optional)
- Butterfly templates or craft paper
Step-by-Step Guide to Creating the Garland
- Inflate the Balloons
- Inflate pairs of balloons to different sizes (9 inches and 7 inches in diameter). Don’t worry about perfect sizing—approximate measurements work well.
- Squeeze slightly to make them rounder.
- Tie Balloons in Trios
- Tie two balloons together by the necks.
- Add a third balloon by wrapping its neck around the first two.
- Make several trios using different shades and combinations.
- Create Double Balloons for a Unique Look
- Insert a dark violet balloon inside a white one using a stick or pencil.
- Inflate the inner balloon to create a soft velvet texture with a custom color effect.
- Assemble the Garland
- Take a nylon string and secure the first trio tightly.
- Add more trios by wrapping the string between them, alternating colors every 3-5 trios.
- Continue until your garland reaches around 3.5 to 4 meters.
- Mount the Garland on a Frame
- Use a lightweight aluminum frame (2.5m high x 1m wide).
- Attach clamps and elastic bands along the frame where you want to hang the garland.
- Secure the balloon clusters using the elastic bands.
- Add Visual Weight at the Bottom
- Inflate 18-inch balloons and tie them with 260 balloons.
- Wrap the 260s around the main garland structure to secure them.
- Fill gaps around these large balloons with additional trios.
- Create Decorative Clusters
- Use small leftover balloons to create triple-bubble clusters.
- Tie them with elastic bands and use them to cover visible string or small gaps.
- Incorporate Butterfly Decorations
- Cut butterfly shapes from glitter foam paper using a template.
- Attach them using double-sided tape or silicone glue.
- Vary the sizes and distribute them across the garland for a whimsical look.
- Add a Light-Up Sign
- Use an LED neon sign with built-in hooks.
- Hang it from the center of the frame using a clip and nylon thread.
Pro Tips for Success
- Use 260 balloons and elastic bands to make your elements easy to adjust.
- Mix balloon finishes (matte, metallic, and clear) for added depth.
- Install the base before adding small decorative details.
- Always have extra balloons and clips on hand for last-minute fixes.
FAQs
Q: Can I do this without a frame? A: Yes! You can hang your garland on a wall or use command hooks and fishing line.
Q: How long will the garland last? A: Indoors, it can last several days. For outdoor events, avoid direct sunlight and wind.
Q: Do I need helium? A: Not at all. This garland is designed to be air-filled only.
This lilac balloon garland with butterflies and lights is not only stunning but also beginner-friendly. With a bit of creativity and some simple tools, you can achieve a professional-looking setup that adds joy and elegance to any event. Follow each step, use the recommended tools, and don’t be afraid to experiment with color and design. Whether it’s your first attempt or you’re refining your skills, this guide ensures your decoration will be unforgettable.